Setting Up a Virtual Malware Analysis Lab
Introduction
In this lab, we will build a safe and controlled virtual environment for malware analysis using VirtualBox and a Windows 10 virtual machine. The goal is to configure an isolated system where malware samples can be executed and studied without risking the host machine.
The setup process involves several key steps:
- Installing and configuring VirtualBox with a Windows 10 ISO.
- Taking snapshots to preserve clean states and allow easy rollbacks.
- Disabling Windows Defender and related security features that may interfere with malware execution.
- Install FLARE‑VM and the recommended analysis toolset (Procmon, Process Hacker, Sysmon, FakeNet, Wireshark, etc.).
- Perform a controlled dynamic execution of a malware sample to validate the lab setup and capture process, registry, file, and network artifacts.
This tutorial is part of the Building Malware Analysis Lab module in the Malware Analysis learning path on LetsDefend.
Setting up a virtual lab
- Download Oracle VirtualBox. If you have it installed, make sure it is updated to reduce the risk of malware escaping.
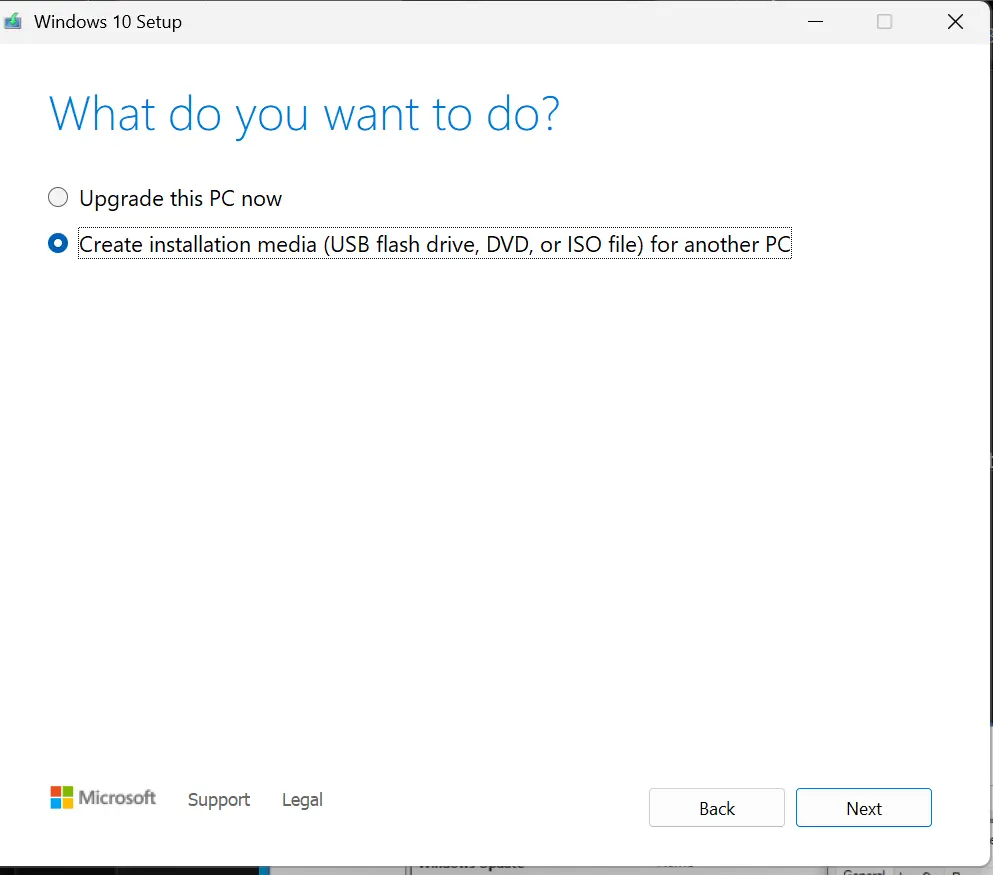
Download the Windows 10 ISO file. First, download the Windows 10 installation media. Once it finishes downloading, double-click it and choose Create installation media.
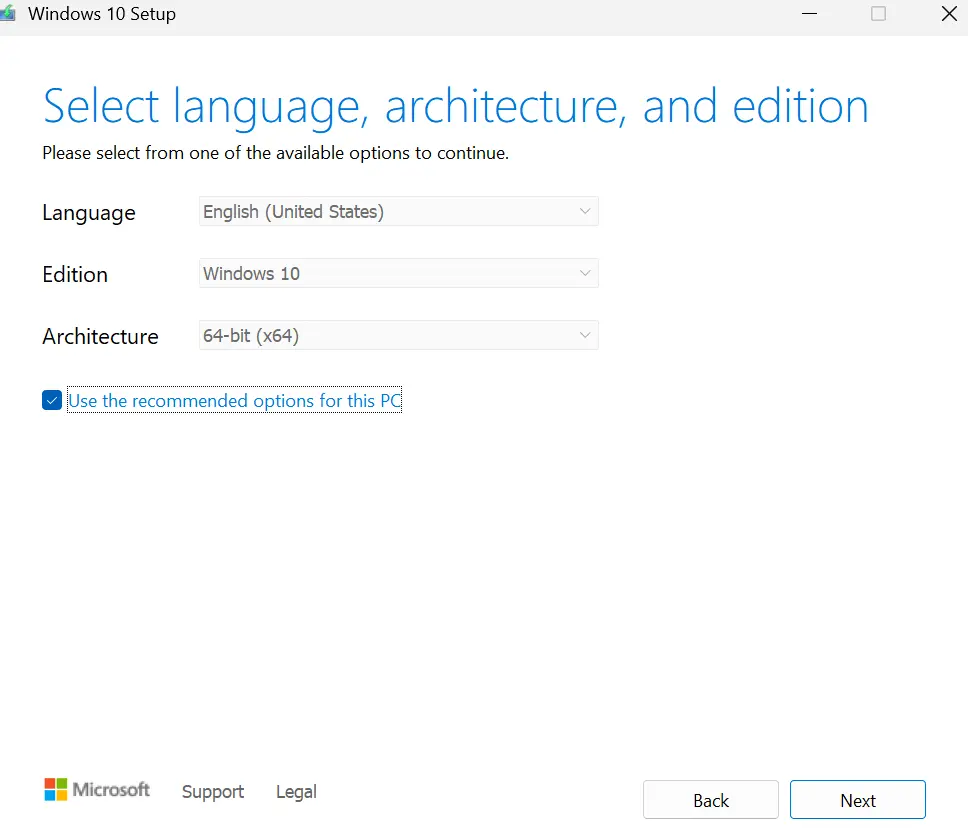
For the language, architecture, and edition, select the recommended options.
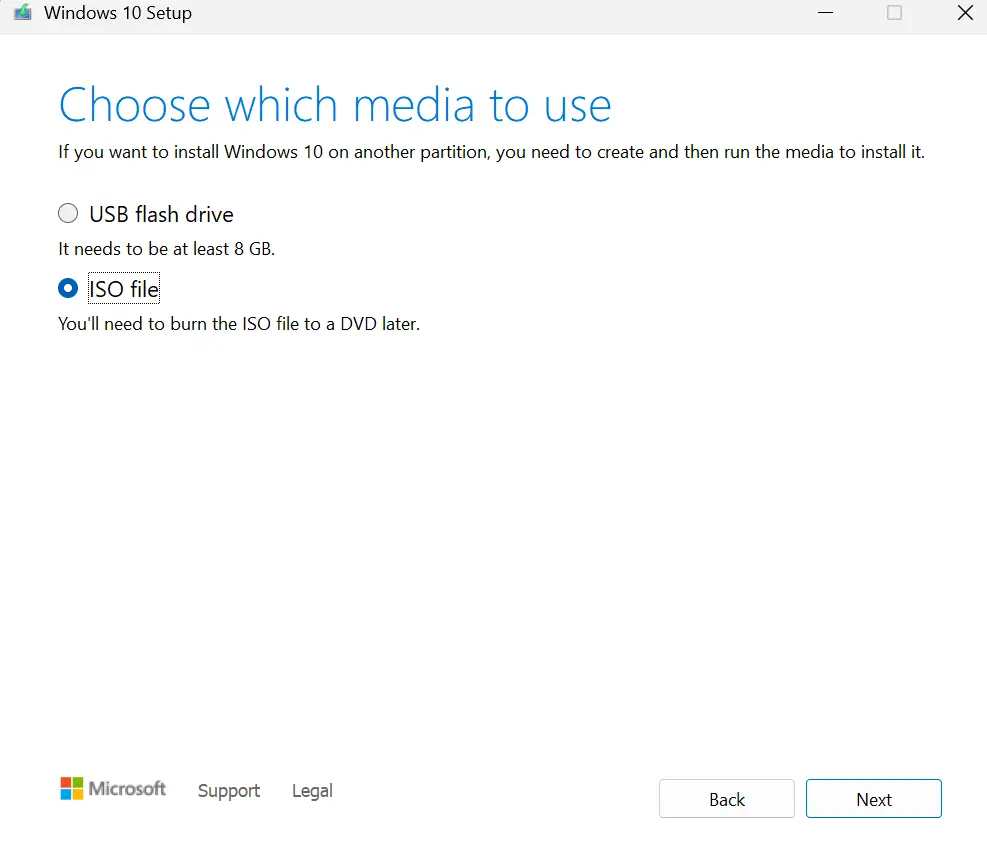
Then choose the ISO file and click Next
Save the
.isofile to a separate drive to avoid issues when configuring VirtualBox.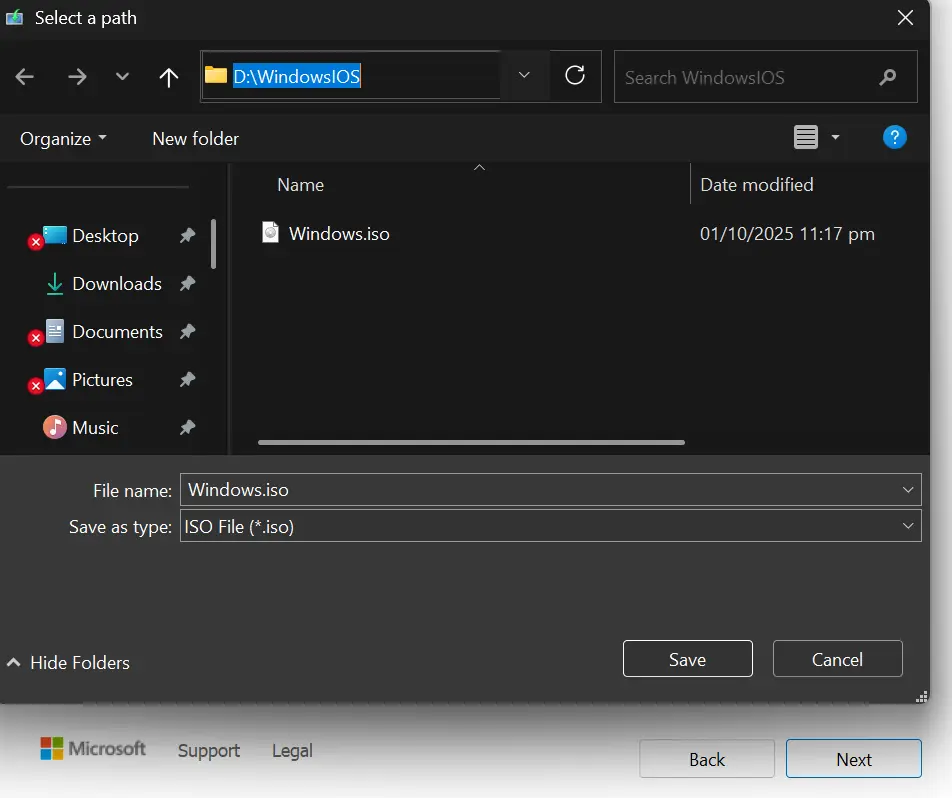
Wait for the download to complete, then click Finish. The ISO is now ready to be used in VirtualBox.
Set up the VM in VirtualBox. From the Machine tab, click New to create a new virtual machine.

Name the VM and select the Windows 10 ISO image you downloaded earlier.
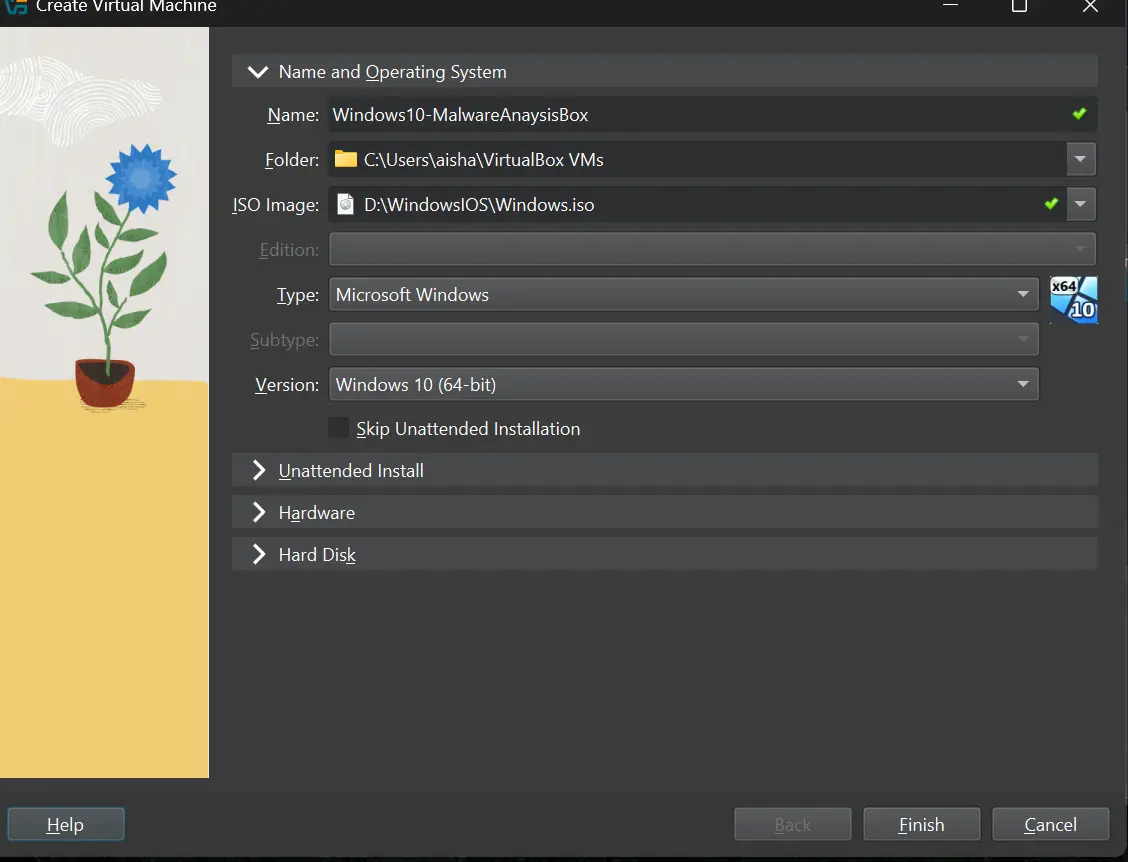
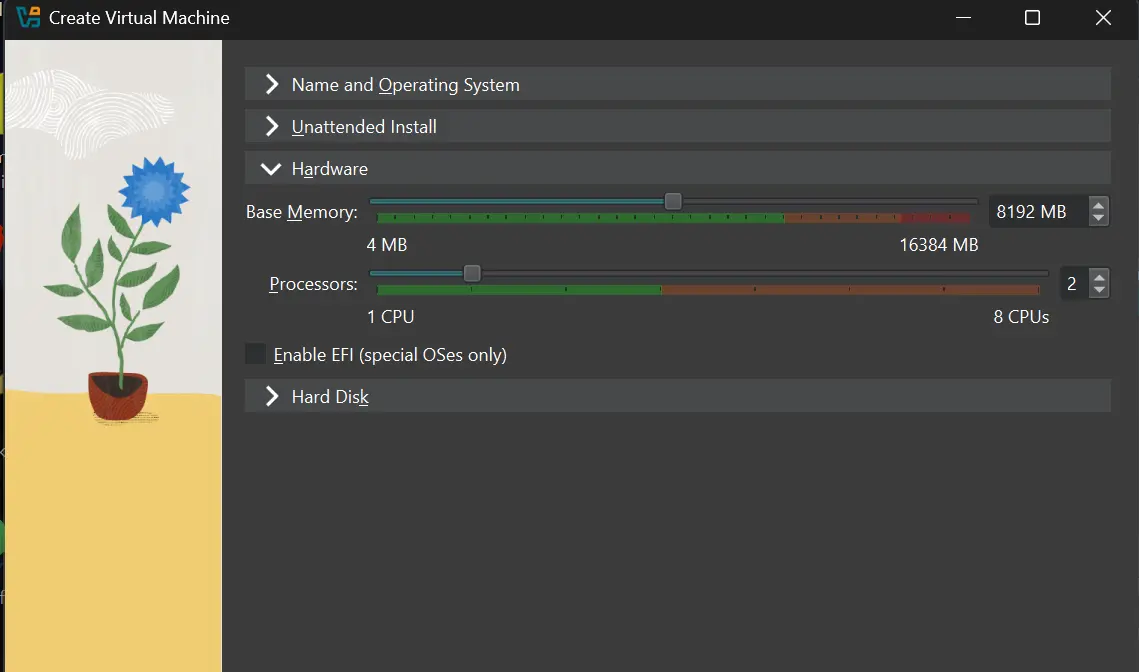
According to the Flare-VM requirements, at least 2 GB of memory is needed. Based on your system specs, allocate 4–8 GB. For processors, assign at least 2 CPUs.
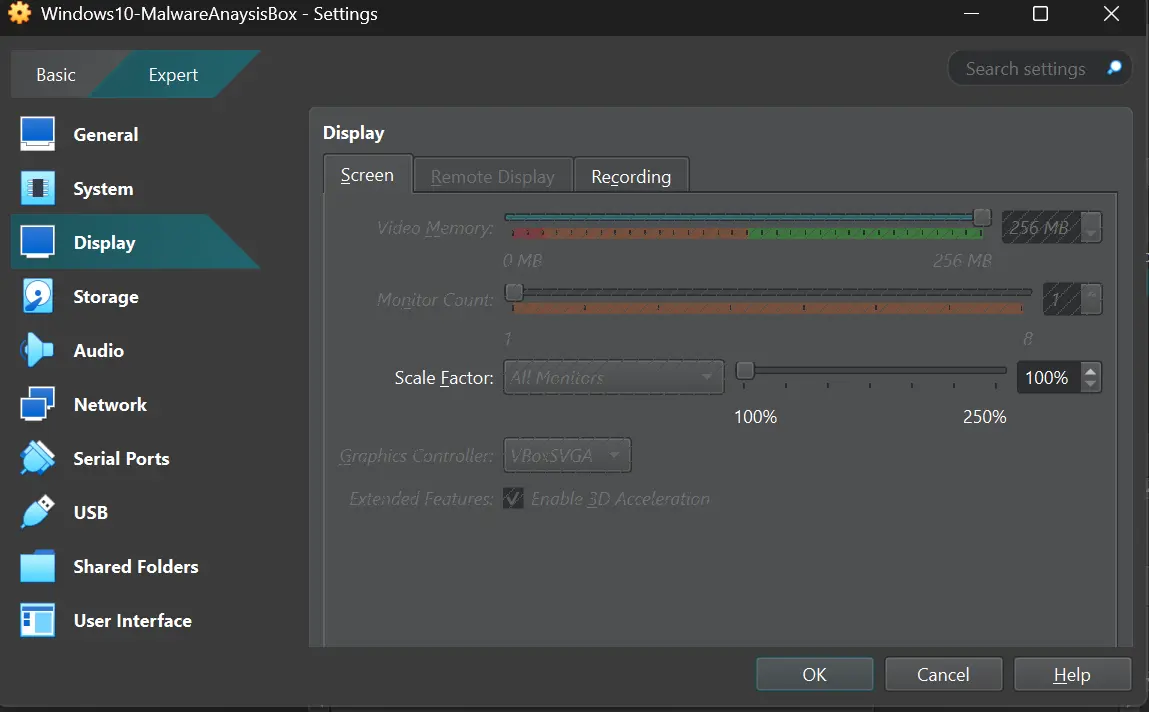
For the Hard Disk, allocate at least 60 GB (80 GB recommended). Save the configuration and start the VM. If you run into boot problems, power off the VM, go to Settings > Display, and enable 3D Acceleration.
Take Snapshots
To take a snapshot of the current VM state, go to the Snapshots tab on the right side of the VM details.
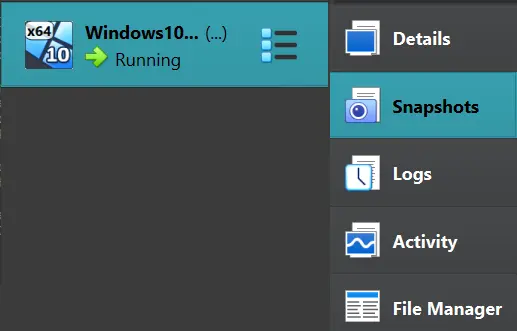
And then click the “Take” icon.

In this lab, we will take four snapshots:
- Base machine, before making any changes.
- After disabling Windows Defender (policies and configurations).
- After installing Flare-VM.
- After installing the tools required for dynamic malware analysis.
Disabling Windows Defender
- Disable Windows Update
Press
Windows + R, typeservices.msc, then locate the Windows Update service and stop it.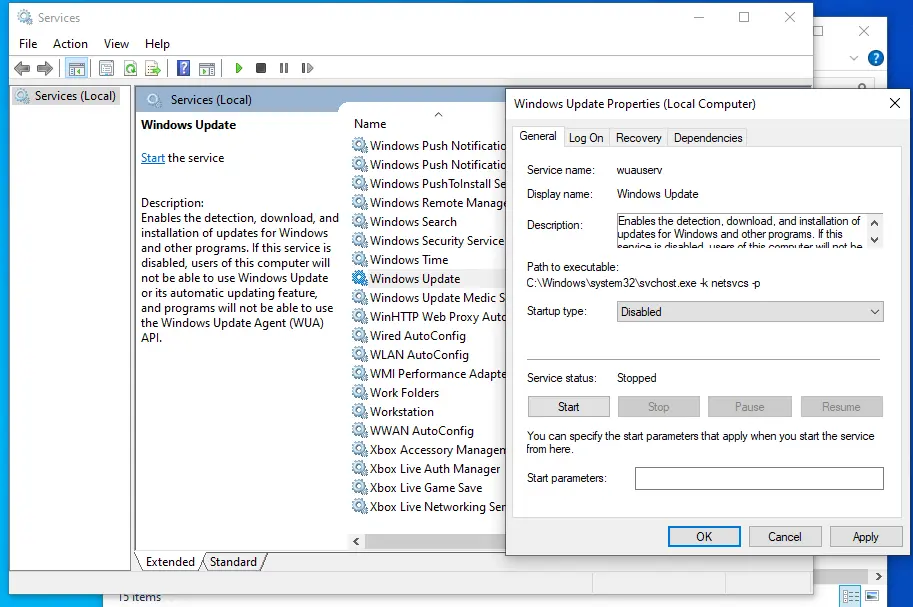
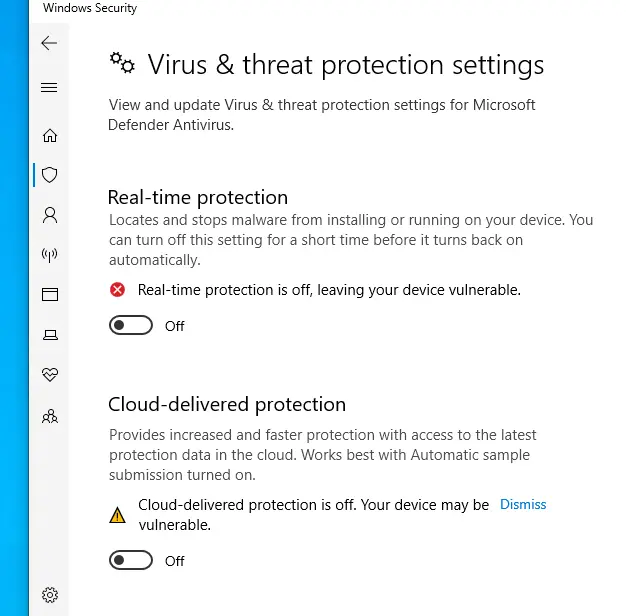
- Disable Windows Security
- Windows Security Settings. In the search bar, type Windows Security, then go to Virus & Threat Protection > Manage Settings, and turn off Real-time protection.
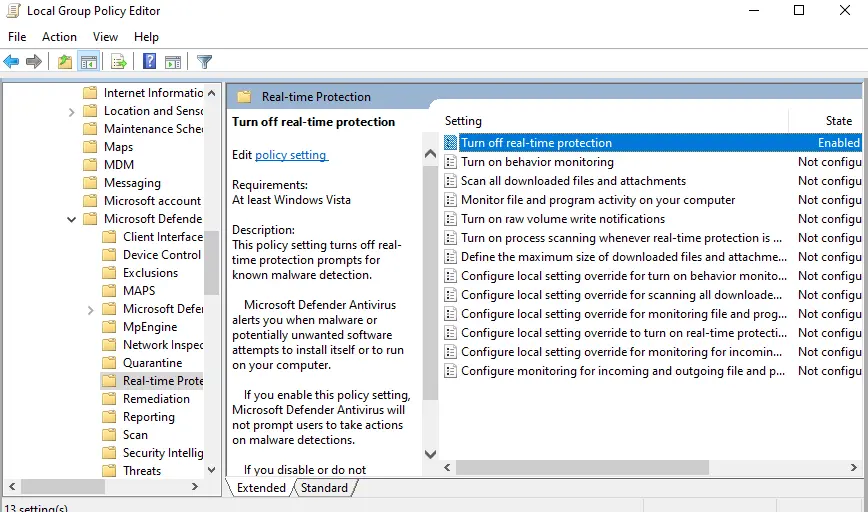
- Local Group Policy
- Press Windows + R and type
gpedit.msc - Navigate to Local Computer Policy > Administrative Templates > Windows Components > Windows Defender Antivirus > Real-time Protection.
Enable the Turn off real-time protection policy.
- Reboot the system
- Press Windows + R and type
- Diable Hide Extension
- Open File Explorer > View, then check Hidden items (to view hidden files/folders) and check File name extensions.
By default, Microsoft hides executable file extensions, which malware often abuses to masquerade as files like PDFs.

Installing Flare-VM
FLARE VM is a collection of software installation scripts for Windows systems that allows you to easily set up and maintain a reverse engineering environment on a virtual machine.
- Before installing Flare-VM, take a snapshot of the VM so you can revert to a clean state in case the installation fails.
- This tool takes longer to install because it automatically downloads and configures multiple analysis utilities.
Installation Instructions: Make sure all prerequisites are met.
- Download and save this PowerShell script to a folder
- Open PowerShell as administrator
Unlock the installation script
1
 Unblock-File .\install.ps1
Enable script execution
1
 Set-ExecutionPolicy Unrestricted -Force
Lastly, run the installer script
1
 .\install.ps1
After installation, it is recommended to switch the VM to host-only networking mode and take a new snapshot.
Dynamic Malware Analysis
- Sample names:
e-Archive Dekont.exe(original filename), copied toVbxFiQYCyFDgGL.exeon execution - MD5 Hash: 7a0093c743fc33a5e111f2fec269f79b
- SHA256 Hash: 722ef401e5cbb067c5c33faa402774d3c75ef08e0c8cc4d7e66a9cfa53684088
- VirusTotal Report: 722ef401e5cbb067c5c33faa402774d3c75ef08e0c8cc4d7e66a9cfa53684088
Tools:
After Flare-VM installation, ensure that you have these tools installed, which will assist us in malware analysis. You can switch your VM network interface to NAT or download it from your host machine, then transfer it to the VM.
- HashMyFiles: a utility that allows you to calculate the hashes of one or more files in your system
- Reghshot: It is a registry compare utility that allows you to quickly take a snapshot of your registry and then compare it with a second one
- FakeNet: it is a tool that is used to simulate the internet, which is useful in malware analysis.
- process hacker
- process monitor
1
2
3
4
5
6
  # install sysmon zip file
  # install the configuration file on the vm and save it to C:\Windows\config.xml
  Invoke-WebRequest -Uri https://raw.githubusercontent.com/olafhartong/sysmon-modular/master/sysmonconfig.xml -OutFile C:\Windows\config.xml

  # then open powershell command-line as administrator and install sysmon with the configuration file we downloaded
  .\Sysmon64.exe  -accepteula -i C:\Windows\config.xml
- Wireshark → to open the pcap files generated from the execution of fakenet
Once finished, take a snapshot and save it for the dynamic malware analysis labs so you won’t have to redownload these tools after reverting any changes made by the malware.

Preparation
Download the Malware Sample
Download the Malware Sample from the MalwareBazaar website, then transfer it to your VM by enabling the shared folders and checking the Auto-mount option (the shared folder must be on the same drive as the ISO file). The malware will be downloaded as a zip file with password protection, so it is safe to download as long as you don’t extract it and execute it on your host machine.
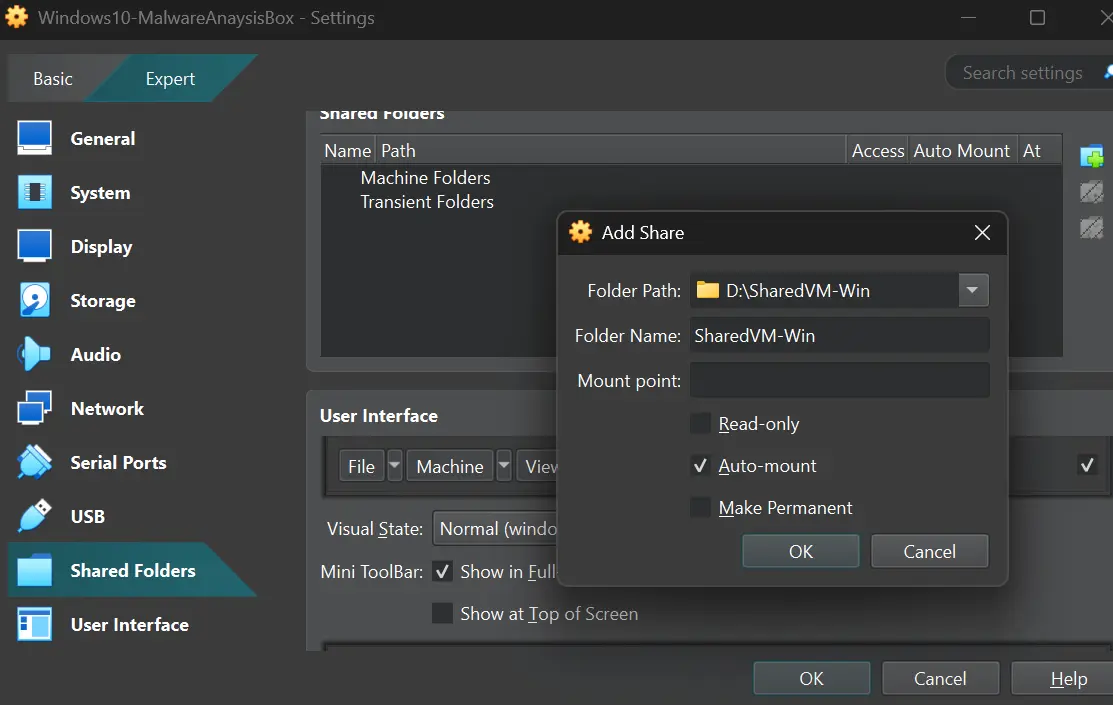
You should see the shared folder in your VM now
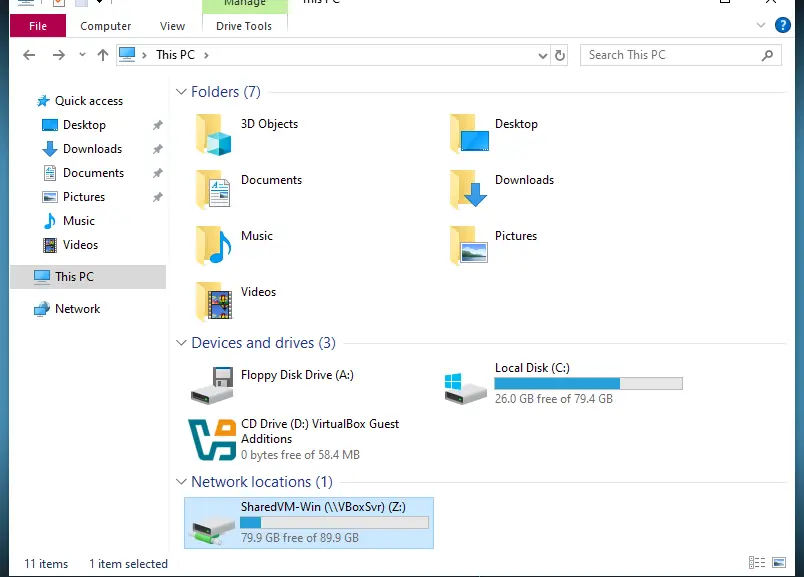
After you transfer the malware sample archive, change the permissions of the shared folder to Read-only or delete the shared folder from the VM settings.
Network Interface Settings
Next, set the VM network adapter to Host-only Adapter and enable the Cable Connected option. This gives the VM a private Ethernet interface that Fakenet can bind to.

This way, malware will be isolated from the Internet but allowed to use network stacks.
- Clear Sysmon events
Set up FakeNet (MITM for network capture & decryption): Before executing
fakenet.exe, import FakeNet’s CA certificate from theconfigsfolder into the guest VM’s Trusted Root Certification Authorities (LocalMachine\Root) so FakeNet can act as an active MITM and decrypt TLS traffic. When the FakeNet CA is trusted by the guest OS, FakeNet can either write decrypted HTTP(s) data to its logs or produce PCAPs that include decrypted traffic.1
Import-Certificate -FilePath "C:\Tools\fakenet\fakenet3.5\fakenet3.5\configs\fakenet_ca.crt" -CertStoreLocation Cert:\LocalMachine\Root
Then run fakenet.exe with administrator privileges
- Prep the Process Hacker and Procmon to catch the malware execution
Analyze
Time of execution 10/05/2025 1:45:11 AM
Process Activity——————————————
Once executed, Process Hacker briefly shows the sample, but the malware quickly terminates itself after spawning child processes. Because Process Hacker only displays currently running processes, use Procmon to view both terminated and active processes.
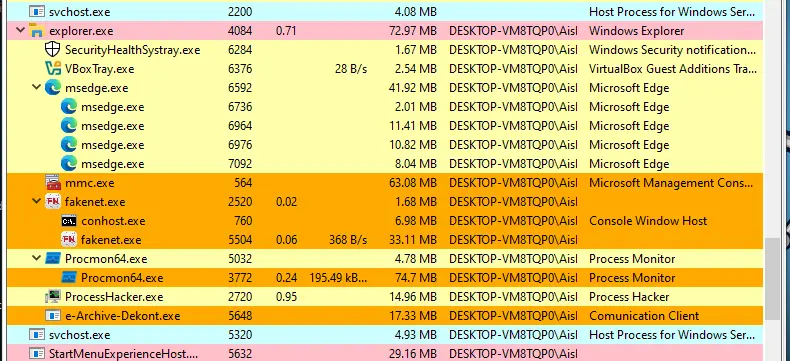
In Procmon, press the “Show Process Tree” button in the top menu to view the parent-child processes in a tree format. As you can see, the malware spawned two processes, powershell.exe and schtask.exe, then it terminated itself

The command from the powershell.exe process:
1
Add-MpPreference -ExclusionPath "C:\Users\Aisha\AppData\Roaming\VbxFiQYCyFDgGL.exe"
This adds the file to Microsoft Defender’s exclusion list, preventing real-time and scheduled scans from detecting that binary. The hash of the copied binary matches the malware sample.
1
2
3
4
5
PS C:\Users\Aisha> Get-FileHash -Algorithm sha256 C:\Users\Aisha\AppData\Roaming\VbxFiQYCyFDgGL.exe

Algorithm       Hash                                                                   Path
---------       ----                                                                   ----
SHA256          722EF401E5CBB067C5C33FAA402774D3C75EF08E0C8CC4D7E66A9CFA53684088       C:\Users\Aisha\AppData\Roaming\VbxFiQYCyFDgGL.exe
The scheduled-task child created persistence:
1
CommandLine: "C:\Windows\System32\schtasks.exe" /Create /TN "Updates\VbxFiQYCyFDgGL" /XML "C:\Users\Aisha\AppData\Local\Temp\tmp252B.tmp"
The schtasks.exe creates a new task named “Updates\VbxFiQYCyFDgGL”. You can verify the task by:
1
schtasks.exe /QUERY /TN "Updates\VbxFiQYCyFDgGL" /FO LIST /V
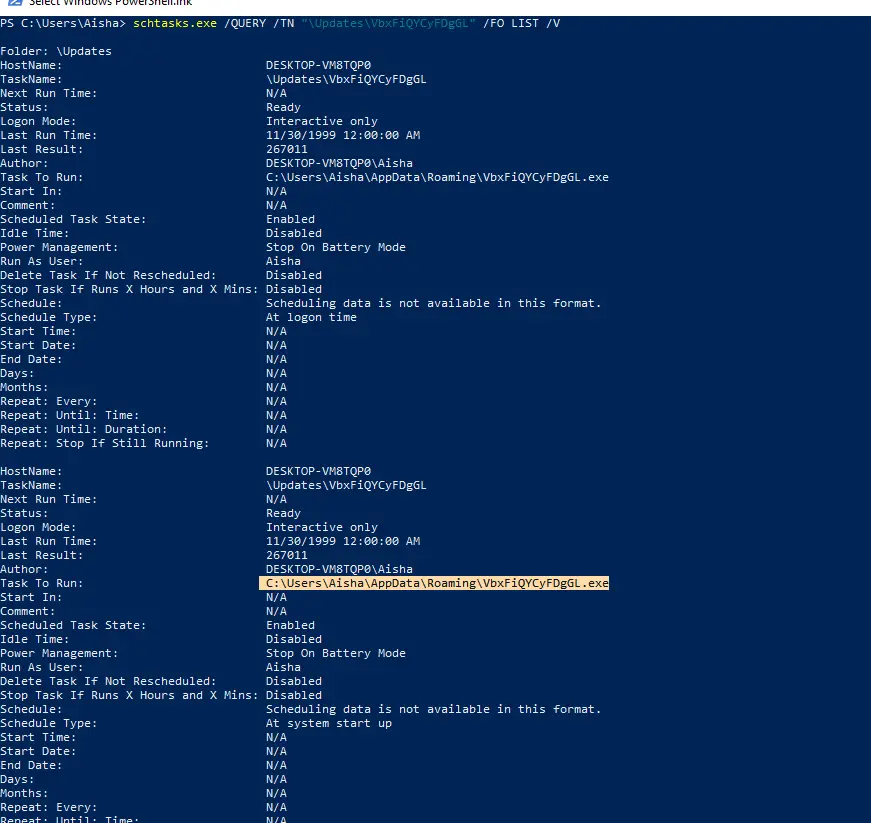
This task is configured to run the malware located at “C:\Users\Aisha\AppData\Roaming\VbxFiQYCyFDgGL.exe” at startup, confirming persistence.
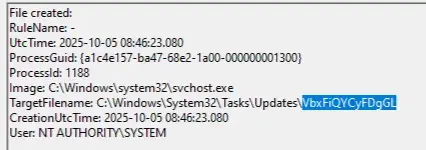
Registry Activity——————————————
In the sysmon, a registry value set was captured (Event ID 13)
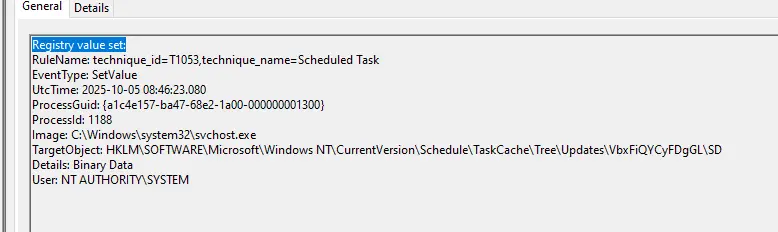
This event shows svchost.exe (running as SYSTEM) wrote a new registry value under the Task Schedule’s TaskCache, which indicates that the malware established a persistence via a scheduled task.
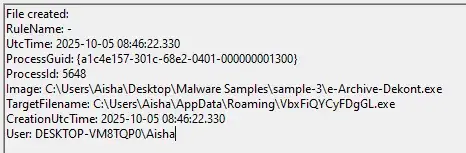
File Activity——————————————
Sysmon captured file creation activity (Event ID 11) made by the malware under the Updates folder and also under the AppData folder
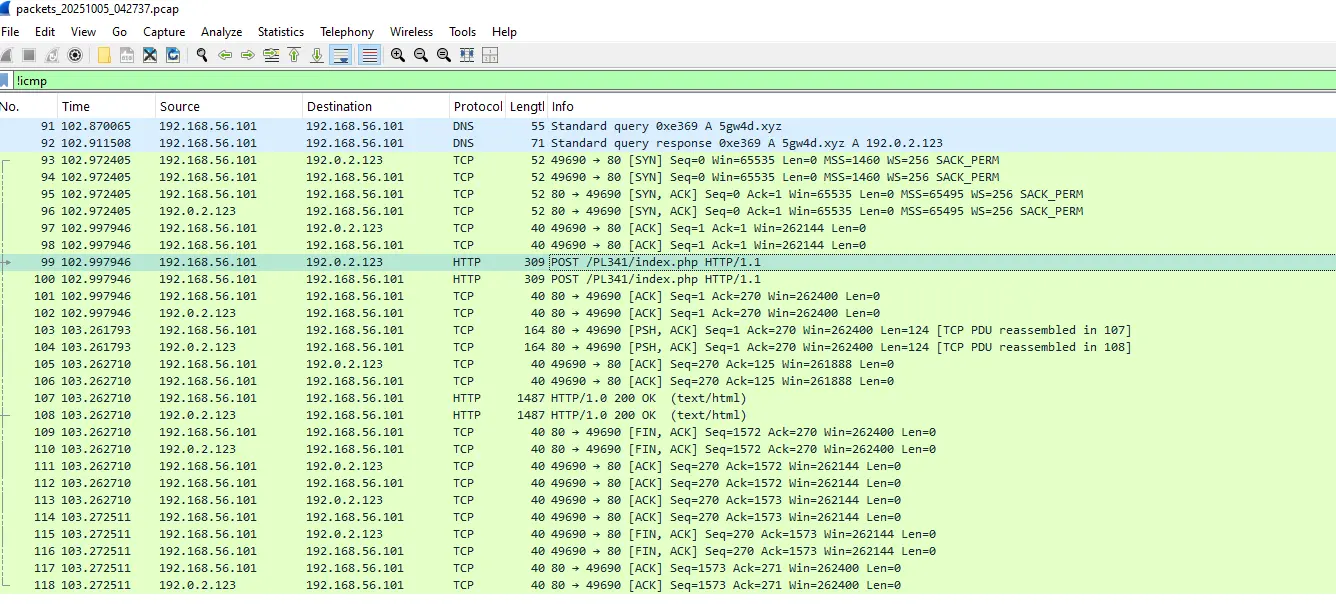
Network Activity——————————————
Let Fakenet run for a while to ensure it captures the network activity made by the malware, then stop it by pressing (Ctrl+C) to flush and save the pcap file and logs.
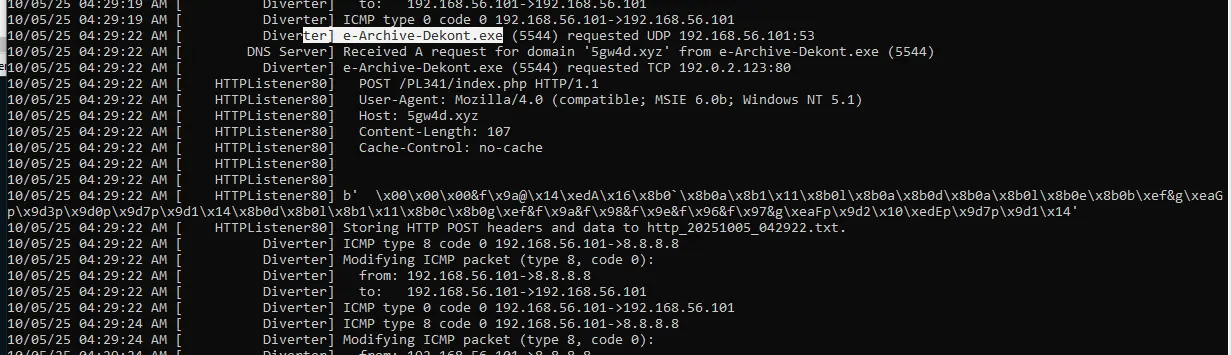
Opening the PCAP in Wireshark shows a DNS query for the malicious domain, followed by an HTTP POST to that host: http[:]//5gw4d[.]xyz/PL341/index.php
Artifacts
- SHA256:
722EF401E5CBB067C5C33FAA402774D3C75EF08E0C8CC4D7E66A9CFA53684088 - Filenames:
e-Archive Dekont.exe,VbxFiQYCyFDgGL.exe - Domain:
5gw4d[.]xyz - URL:
http[:]//5gw4d[.]xyz/PL341/index.php - Scheduled task:
Updates\VbxFiQYCyFDgGL - PowerShell command:
Add-MpPreference -ExclusionPath "<path>"
Conclusion:
The dynamic analysis of the malware sample e-Archive Dekont.exe revealed that the malware primarily focuses on persistence and defense evasion. Upon execution, it copied itself to the AppData\Roaming directory with a random name, and created a scheduled task (Updates\VbxFiQYCyFDgGL ) to ensure automatic execution at the system startup. It also disables Windows Defender protection by adding itself to the exclusion list. As for the network traffic captured by Fakenet.exe, it showed that the malware attempts to communicate with a C2 server hosted at 5gw4d[.]xyz , likely to exfiltrate data or receive further commands.